By Knight Stivender
June 11, 2020
There are a lot of wonderful tools to help marketers create SEO-friendly content. MP&F uses Moz Pro to help identify content ideas of interest to our clients’ stakeholders. We then use that same tool to build and maintain websites and create blog posts that will be more easily found by search engines like Google.

For example, let’s say we are working with a client who sells high-end home décor. Moz will help us understand what words and phrases to use on our client’s website, what blogs to write, and what stories to share with home interior influencers if we want our client’s website to rank higher in organic search returns.
If your organization can afford a tool like Moz and has the in-house expertise to execute its recommendations, we highly recommend it.
If not, you can hire us to assist.
If resources and budget are minimal right now, we’ve outlined a way to use the Google Keyword Planner as a workaround. The Keyword Planner is a tool designed to assist media buyers with advertising decisions; SEO is not its intended use. That makes using it as such a little clunky, but it works. And it’s free.
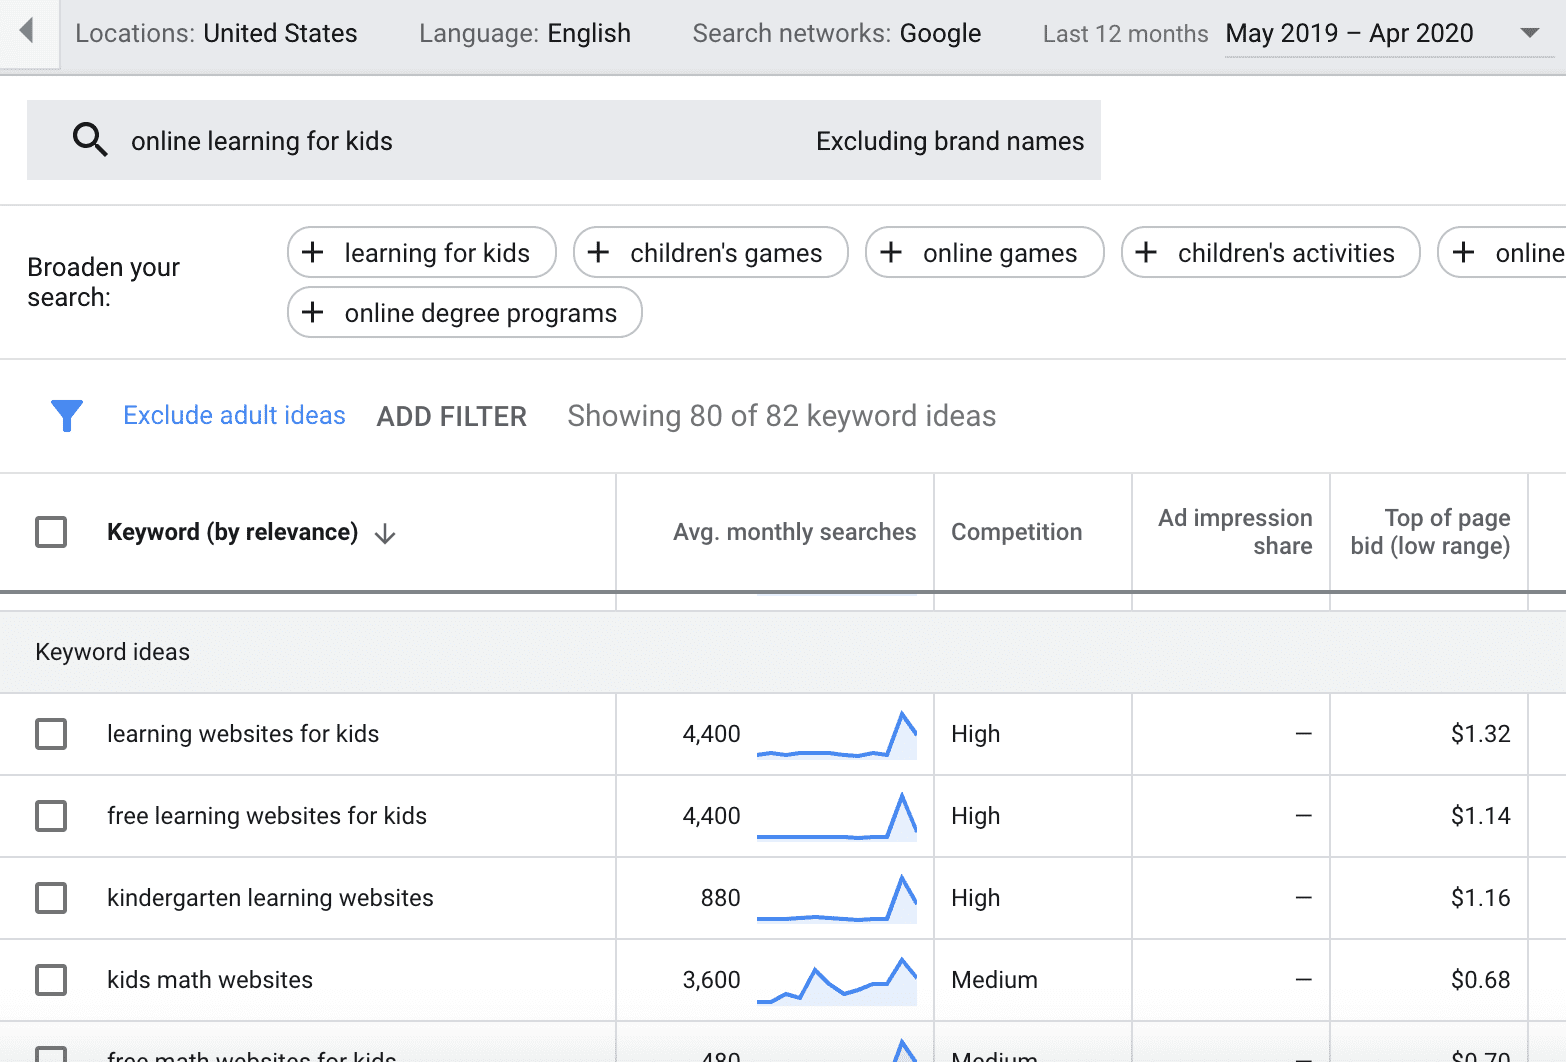
Here’s a step-by-step guide for using the Google Keyword Planner as an SEO tool for digital writing projects including blogs, product descriptions and other website content.
Step 1. Set up a Google Ads account.
You need a Google Ads account to use the Keyword Planner, but it’s free and relatively easy to set one up. You may end up using it later to buy and schedule ads — or not. Don’t worry. It would be impossible to accidentally buy ads without connecting a payment method to your account.
Step 2. Open the Keyword Planner.
Once you’re in your account, click on the wrench icon in the navigation bar; it is labeled “Tools & Settings.” Select Planning/Keyword Planner. You’ll be given a choice between “Start with Keywords” and “Start with a Website.” Choose the former.
Step 3. Enter search terms.
Enter products or services you think your customers or clients might naturally search to find your website. Toggle the “Include brand names in results” switch so that your own company name (or your competitors’ names) don’t show up in the search results. Hit “Get Results.”
Step 3. Refine your search.
On the search results page, refine your search by choosing a location, language and timeframe that makes sense for your business. You can also choose a search network — Google or Google and search partners. For this purpose, we recommend choosing Google only.
Step 4. Review data.
The resulting table will show you a list of words and phrases people are searching — along the popularity of those terms — during the timeframe you’ve selected. You can download this data and share with others if you’d like.
For each keyword or phrase, you’re looking at two data points in particular: Average Monthly Searches and Competition. Average Monthly Searches shows you how popular the term is. Competition shows you how many Google advertisers are bidding on it; you can extrapolate from this how challenging it may or may not be to get your content to rank for this term given all the others who are paying to do likewise.
Step 5. Put findings to use.
Use this free information to help you make decisions about content — including headlines and key phrases — for your website, blog and media pitches.
For example: If monthly searches for “leather couches” are high in January but low in August, this lets you know that August may not be the best time to feature leather couches on the front of your home interiors website. If search volume is high for “talking to mom about senior living,” you may want to include that phrase in a headline on your senior living company’s blog.